Complete Workflow Language Guide
This guide will teach you how to create organized workflows for any situation using a set format and special characters - from planning your holiday dinner to onboarding new employees. Think of it as a way to write down step-by-step instructions that can be shared, tracked, and completed by others.
Common uses include:
- Home & Family: Holiday meal planning, home maintenance schedules, family emergency plans
- Work: Employee onboarding, customer setup processes, inspection checklists
- Events: Wedding planning, party organization, travel itineraries
- Knowledge Transfer: Passing down family recipes, teaching household routines, documenting procedures
How It Works
You write your workflow using simple text formatting in the editor on the left side of your screen. As you type, you'll see a formatted version appear on the right. When you're ready, click the "Run" button to start using your workflow.
The Building Blocks
1. Checklist Title
Every workflow starts with a title. This should be the very first line of your text.
My Holiday Dinner Checklist
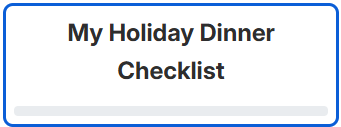
Why this matters: The title helps you and others quickly understand what this workflow is for.
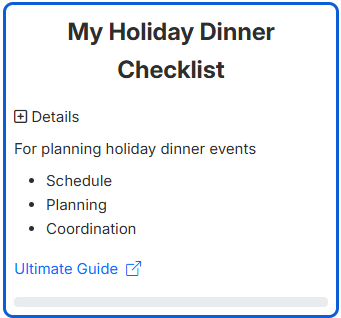
Add Extra Information in the title header (Optional):
My Holiday Dinner Checklist
For planning holiday dinner events
- Schedule
- Planning
- Coordination
https://kathleenflinn.com/holidaymenu/ "Ultimate Guide"
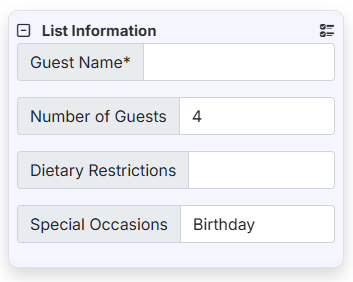
2. Form Data - Information You Need
Form data lets you collect information that will be used throughout your workflow. Think of it like filling out a form before you start. If defined before you start the tasks, they're part of the start of the run. If defined within a task, they're collected within the run.
Format: Information Label|Default Value
- Use
*after the label to make it required - Leave the default value blank if there isn't one
Guest Name*|
Number of Guests|4
Dietary Restrictions|
Special Occasions|Birthday
Real-world example: When onboarding a new employee, you might collect their name upfront, but learn their desk assignment later in the process.
Two types of form data:
- Upfront: Information you know before starting (like the new employee's name)
- During tasks: Information you'll collect as you complete tasks (like their computer serial number)
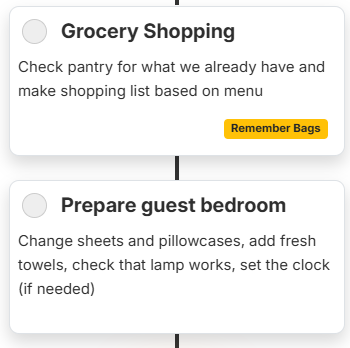
3. Tasks - The Main Steps
Tasks are the heart of your workflow. Each task represents something that needs to be done.
How to write tasks:
- Leave a blank line before starting a new task
- Write your task title
- Add details on the following lines
- End with another blank line
Grocery Shopping
Check pantry for what we already have
make shopping list based on menu
!Remember Bags!

Prepare guest bedroom
Change sheets and pillowcases,
add fresh towels,
check that lamp works,
set the clock (if needed)
4. Lists Within Tasks
You can add bulleted lists to make tasks clearer and more organized.
Prepare appetizer table
- Arrange cheese and crackers
- Set out small plates and napkins
- Open wine to let it breathe
- Light candles
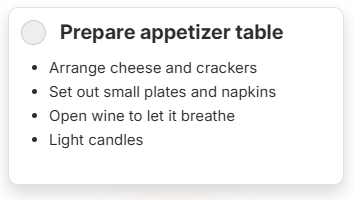
When to use lists: Great for ingredients, supplies needed, or multiple small steps within a larger task.
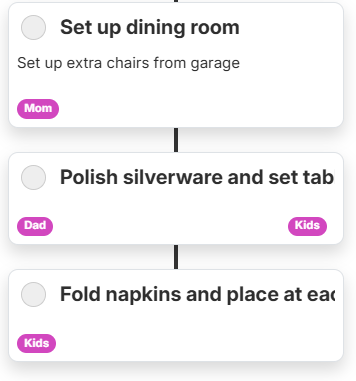
5. Role Assignments - Who Does What
Assign tasks to specific people or groups. This is especially helpful for team projects or family coordination.
Format: [Role Name]
Set up dining room
Set up extra chairs from garage
[Mom]

Polish silverware and set table
[Dad]

Fold napkins and place at each setting
[Kids]
Flexible options:
- Use names:
[Sarah],[Mike] - Use roles:
[Manager],[HR Team]
Assignments:
After you make assignments, you'll need to enter their emails for notifications
The system will handle all the notifications and reminders
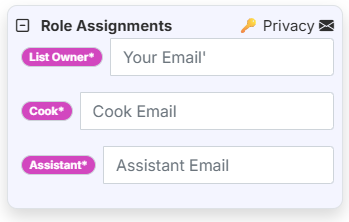
Why Roles / Emails? When working with multiple teams and people, roles are easier to identify with and maintains privacy.
6. Links - Additional Resources
Add helpful links to provide more context or instructions.
Format: https://website.com "Description"
Research catering options
Compare local restaurants and their holiday menus
https://www.localrestaurant.com "Local Restaurant Holiday Menu"
https://www.cateringcompany.com "Catering Company Options"
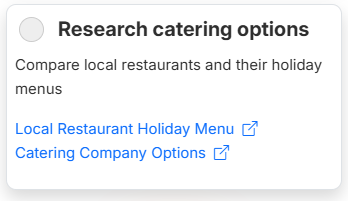
When to use: Recipe links, instruction videos, vendor websites, or reference materials.
7. Comments - Notes and Context
Add comments to provide background information or helpful hints.
Format: Lines starting with #
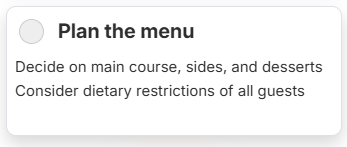
# Remember: Aunt Susan is vegetarian and Uncle Bob doesn't like spicy food

Plan the menu
Decide on main course, sides, and desserts
Consider dietary restrictions of all guests
Best practices: Use comments for important reminders, context that helps completion, or notes for future reference.
8. Due Dates and Times
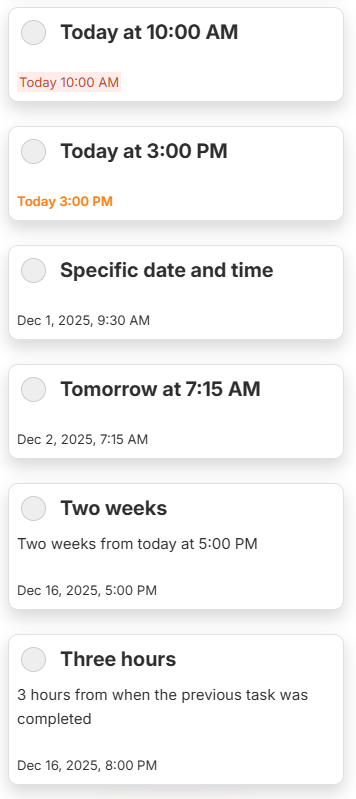
Set when tasks should be completed. Dates and times can be relative to when you start the workflow or specific calendar dates.
Time formats:
Today at 10:00 AM
@T10:00

Today at 3:00 PM
@T3pm

Specific date and time
@2025-12-01T09:30

Tomorrow at 7:15 AM
@+1dT07:15

Two weeks
Two weeks from today at 5:00 PM
@+2wT5pm

Three hours
3 hours from when the previous task was completed
@+3h
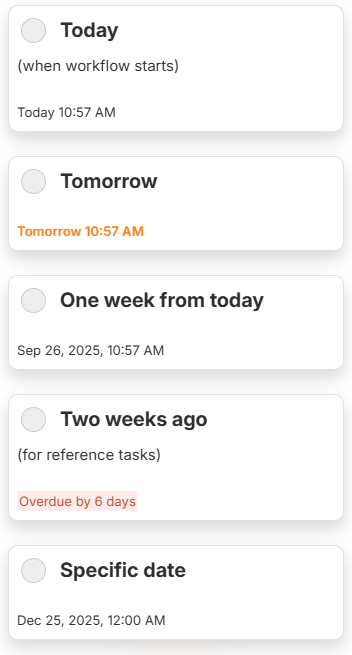
Date formats:
Today
(when workflow starts)
@

Tomorrow
@+1d

One week from today
@+1w

Two weeks ago
(for reference tasks)
@-2w

Specific date
@2025-12-25
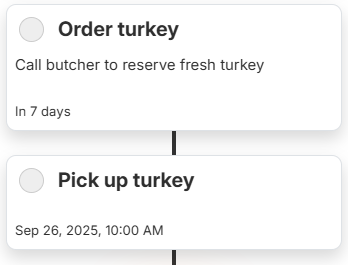
Real example:
Order turkey
Call butcher to reserve fresh turkey
@+1w
# This should be done 1 week before the workflow start date

Pick up turkey
@+1dT10:00
# Pick up 1 day before, at 10 AM
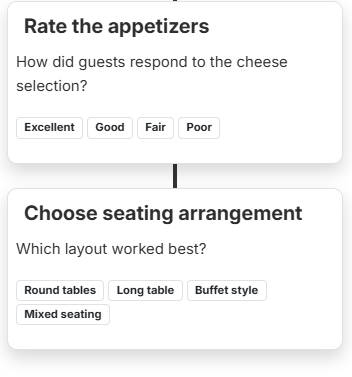
9. Ratings and Choices - Collecting Feedback
Use ratings and choices when you need someone to select from options or provide feedback.
Format: {Option 1, Option 2, Option 3}
Rate the appetizers
How did guests respond to the cheese selection?
{Excellent, Good, Fair, Poor}

Choose seating arrangement
Which layout worked best?
{Round tables, Long table, Buffet style, Mixed seating}
Perfect for:
- Quality inspections:
{Pass, Fail, Needs Review} - Satisfaction surveys:
{Very Satisfied, Satisfied, Neutral, Dissatisfied} - Decision points:
{Approved, Rejected, Needs More Info}
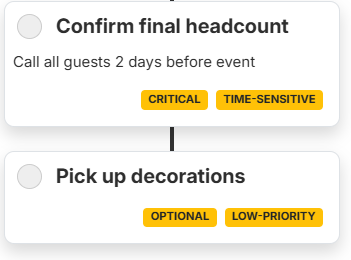
10. Tags - Highlighting Important Items
Use tags to draw attention to critical tasks or categorize them.
Format: !Tag Name!
Confirm final headcount
Call all guests 2 days before event
!CRITICAL! !TIME-SENSITIVE!

Pick up decorations
!OPTIONAL! !LOW-PRIORITY!
Common tag ideas:
- Priority:
!HIGH-PRIORITY!,!LOW-PRIORITY! - Status:
!CRITICAL!,!OPTIONAL! - Categories:
!FINANCIAL!,!CREATIVE!,!LOGISTICS!
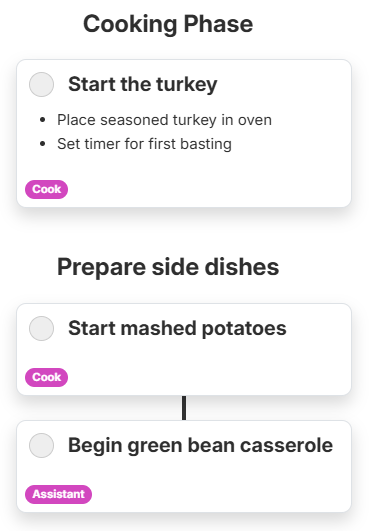
11. Steps - Orchestrating Multiple Tasks
Steps are a powerful way to organize and coordinate multiple tasks, especially when different people need to work together or when timing is critical.
Two types of steps:
One-by-One Steps - Tasks happen in sequence, one after another
Format: *Step Name
*Kitchen Prep Phase

Preheat oven to 350°F
Start oven and check temperature is accurate
[Cook]

*Cooking Phase

Start the turkey
- Place seasoned turkey in oven
- Set timer for first basting
[Cook]

* Prepare side dishes
Start mashed potatoes
[Cook]

* Extra Sides
Begin green bean casserole
[Assistant]
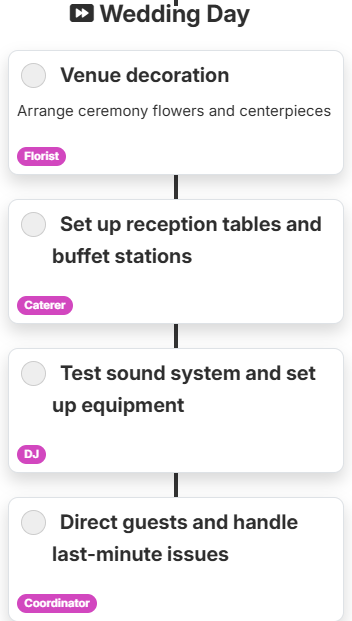
All-at-Once Steps - Tasks happen at the same time
Format: **Step Name
**Wedding Setup - All at Once

Venue decoration
Arrange ceremony flowers and centerpieces
[Florist]

Set up reception tables and buffet stations
[Caterer]

Test sound system and set up equipment
[DJ]

Direct guests and handle last-minute issues
[Coordinator]
When to use One-by-One Steps (*)
- When tasks must be completed in a specific order
- When one task depends on another being finished first
- For step-by-step processes where timing matters
When to use All-at-Once Steps (**)
- When multiple people can work on different tasks simultaneously
- To save time by doing things in parallel
- When tasks are independent but part of the same phase
Real-world example combining both:
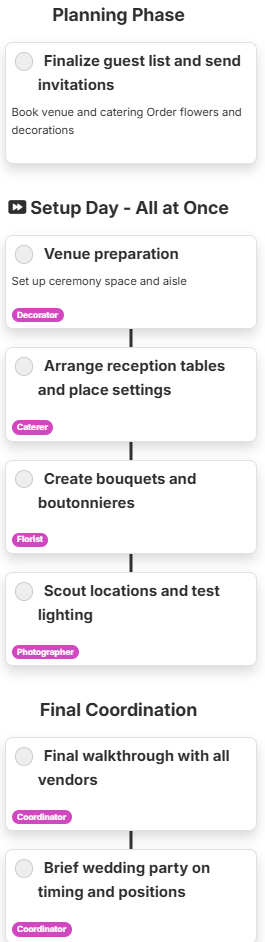
Wedding Plan

*Planning Phase
Finalize guest list and send invitations
Book venue and catering
Order flowers and decorations

**Setup Day - All at Once
Venue preparation
Set up ceremony space and aisle
[Decorator]

Arrange reception tables and place settings
[Caterer]

Create bouquets and boutonnieres
[Florist]

Scout locations and test lighting
[Photographer]

*Final Coordination
Final walkthrough with all vendors
[Coordinator]

Brief wedding party on timing and positions
[Coordinator]
- Use one-by-one steps when order matters (you can't cook before you prep)
- Use all-at-once steps to save time when tasks can happen simultaneously
- You can mix both types in the same workflow
- Steps help prevent bottlenecks and confusion in team projects
Putting It All Together
Here's a complete example showing how all these elements work together:
Holiday Dinner for 8 People

# Form data collected at start
Host Name*|
Number of Guests|8
Event Date*|
Special Dietary Needs|

# This is our main preparation workflow
# Timeline starts 2 weeks before event

Plan the menu
Review guest dietary restrictions and preferences
Decide on appetizers, main course, sides, and desserts
Create shopping list organized by store section
@+2w
!HIGH-PRIORITY!

Order special items
- Call butcher for turkey reservation
- Order wine from vineyard
https://www.localbutcher.com "Butcher Shop Contact"
[Host]
@+10d

Shop for non-perishables
Purchase canned goods, spices, and decorations
- Cranberry sauce ingredients
- Spices for turkey rub
- Candles and centerpieces
- Paper goods backup
@+1w

Final grocery shopping
Buy fresh vegetables and dairy
Pick up turkey from butcher
Get fresh flowers for arrangements
[Family Member]
@+1dT10:00

**Day of preparation

Dining Room
Set up dining room with extra table and chairs
[Kids]

Serving Area
Prepare appetizers and arrange serving areas
[Mom]

Start turkey
Prep and cook turkey
[Dad]
@T8:00
!TIME-SENSITIVE!

**Final review

Review
How did the dinner go overall?
{Excellent, Very Good, Good, Needs Improvement}
What would you change next time?
Comment|
Tips for Success
Keep it simple: Start with basic tasks and add complexity as needed.
Test it out: Run through your workflow once to catch any missing steps.
Get input: If others will use your workflow, ask for their feedback before finalizing.
Use templates: Start with an existing template and modify it for your specific needs.
Be specific: "Prepare food" is too vague alone. Add details "Marinate turkey and prep vegetables" to make it clearer.
Think about timing: Consider how long each task takes and when it needs to be completed relative to other tasks.
Ready to Get Started?
- Choose a template from the available options, or start with a blank workflow
- Write your title as the first line
- Add your tasks with clear, specific instructions
- Preview your work using the display on the right
- Click "Run" when you're ready to start completing your workflow
Remember: The best workflows are the ones that actually get used. Start simple, and you can always add more detail later!